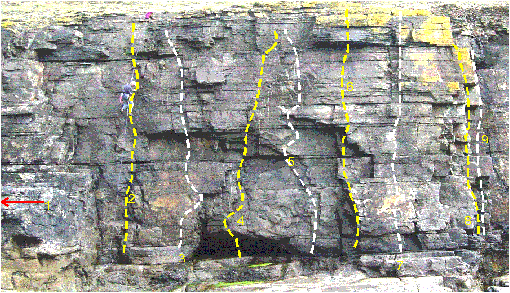
Fisherman’s Wall

1. Little Shrimp (6a+)
an isolated wall over to the left. Two hard moves.
2. Cure HVS 5a
a vague crackline on the left-hand side of the wall complete with PR.
3. Wrasse (6b) ★
a short fingery wall leads to a ledge. Above the shallow groove proves steep but juggy.
4. Cast Adrift (6a+) ★
gains the wall by a stiff pull just left of the cave. The wall above is again juggy.
5. Hook, Line and Stinker (6a+) ★
the steeper wall to the right has superb hidden holds.
6. A Fisherman’s Tackle (6b) ★
the shallow groove line with a hard move through the overlap.
7. Sprats from the Captain’s Table (5)
the wall to the right has a ledge ledge above and below which provides two tricky moves.
8. Top Mouth Gudgeon (5)
the left-hand thin crack in the side wall complete with overlap.
9. Leger System (5)
the next thin crack above the overhang to the left.
Canny Ling (5)
the final thin crack just left of the large corner.