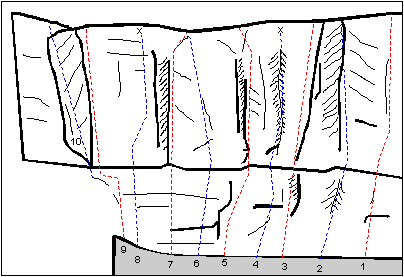
Nine Lives Sector
The first section of crag, just beyond the access gully, gives perhaps the smallest section of crag. This can prove a useful area for easier grade routes. From here you can proceed onto bigger fair further along the Escarpment or indeed sample the delights of the Main Crag.

1. Viva Ramirez E3 6a
Slim right wall of corner with a difficult lower bulge.
2. Private Life E3 6a
The shallow corner gives tricky but worthwhile climbing.
3. Gonna Write a Classic HVS 5b ★
Excellent crack climbing, pity about the name.
4. Discharge (6b+) ★
Again worthwhile via awkward bulge and shallow groove.
5 Nine Lives Gone E1 5a
Can you trust the flake in the obvious groove.
6. Self Destruction E4 6a
An innocuous groove with a difficult bulge, TR and wall finish leftwards.
7. Self Preservation VS 4c
Easiest route on wall via a prominent thin groove.
8. The Unpure (7a)
Left side of the arête, I said the left side.
9. The Chubby Brown Syndrome (5)
Insignificant final groove.
The Itch you Can Never Scratch (5+)
The short steep wall further left.
10. Totally Manning HVS 5a
Left arête of groove.
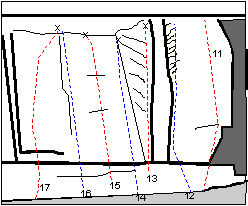
Mandela Buttress Right-Hand
Two prominent, though short corners with a fin mark this section of crag. Short, mainly bolted routes with lower-offs.

11. Mondays never Rain E2 5c
Right arête of right-hand corner, TR.
12. Squelch VS
Pleasant corner: too short for a star?
13. Trans-African Battle (6c)
The fin on its left-hand side. Longer to say than to do!
14. Doyouthinkhesaurus (6b)
The corner. Harderthanitlooks.
15. The Disillusioned Bronto Machine (6c+)
Technical wall.
16. Slug Control (6b+)
Short sharp groove.
17. It’s a Fluke (7a)
Desperate wall.