Two Tier Upper Tier
At the far lefthand end of the Upper Tier is a long low roof beneath the the main horizontal break. The first route starts just to the left of this.
1. Laurels for Hardy (7b+) ★
Start at a single bolt belay at the left end of the upper tier ledge. Climb past a tree and up the wall heading rightwards at the top to a tree belay.
F.A. Chris Hardy 1992. Reclimbed by Alistair Hannah in 1998 after loss of holds.
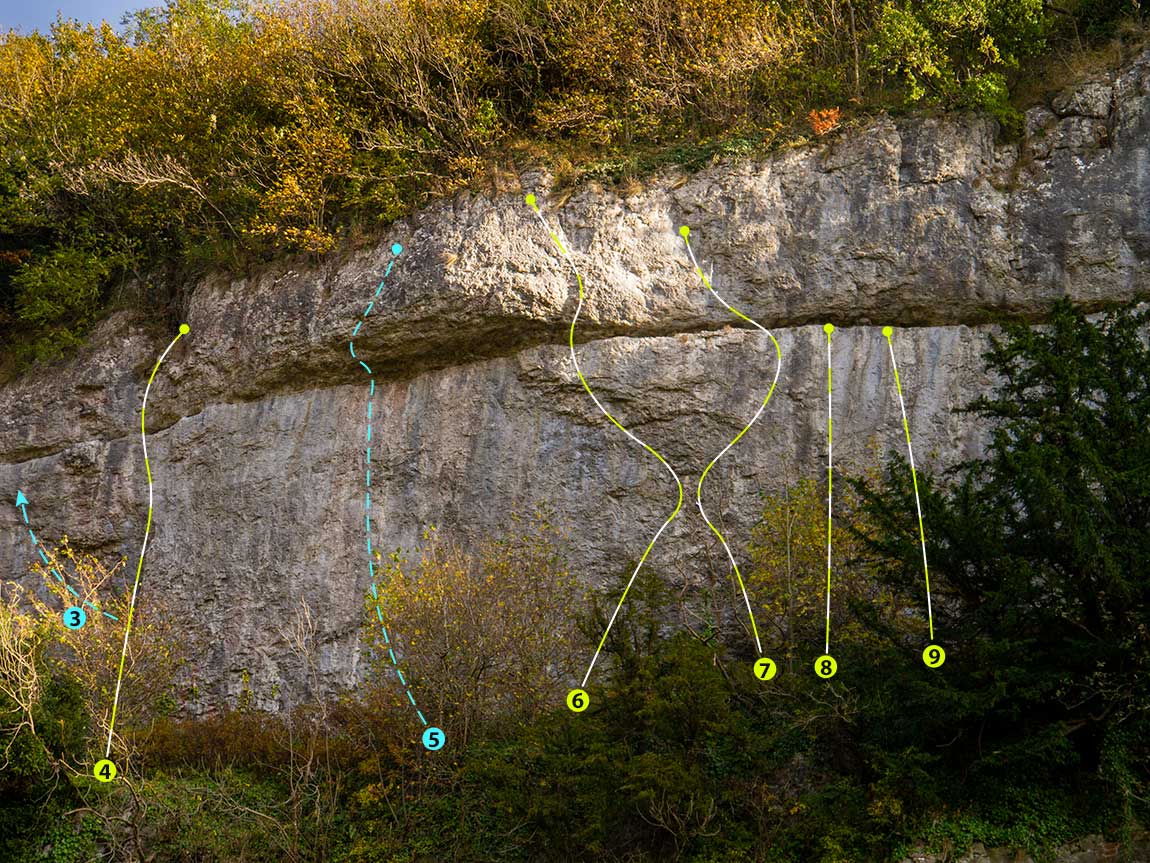
2. In Tiers (8b+)
Climbs the steep wall to the right of the long low roof.
F.A. Steve McClure 2009
3. Open project
4. Darl Pitch 2 (7b) ★
A hard little sequence to gain the break.
F.A. Kim Carrigan 1981
5. Orange Sunshine pitch 2 (A3)
Free beer for life for the first person who frees this old aid route. That was the offer made the first ascentionist back in 1970.
F.A. Bob Dearman 1970
6. Hardcore Junkie (8b)
The desperate wall to the left via a faint groove.
F.A. Alisdair Hannah 2002
7. Welcome to my World (8a) ★
Climb up to the jug on the previous route then go up and rightwards to break. Go leftwards up a depression to the belay.
F.A. Mark Pretty 2009
8. Yew Tree Wall (8b+) ★
The fingery wall up to the left end of the long roof.
F.A. Ben Moon 2020
9. The Curse of the Mummy (8a)
The hanging scoop and wall. Rebolted and reclimbed since loss of holds.
F.A. Simon Nadin 1986

10. A Vision of Loveliness (8a) ★★
A popular route making good use of glued on holds. Fingery and technical climbing leads to the break. The difficulties above this gain improving holds up the wall.
F.A. Ian Dunn 1999
11. A Picture of Perfection (8a) ★
A hard start using some holds on A Vision.. takes one up to the break. Move left and over the bulge and up the wall to the belay.
F.A. Mark Pretty 2009
12. Recycled (7c) ★
Follow The Sea.. to the break. Pull round the bulge and climb up via pockets and a thin seam to the belay on A Picture of Perfection.
F.A. Mark Pretty 2009
13. The Sea is a Brown Paper Bag (7b+) ★★★
Classic. The technical scoop and flake above the break. Immaculate.
F.A. Simon Nadin 1986
14. The Tier Drop Explodes (7c+) ★
Hard fingery climbing up the cream streak gain the roof. Cross this to a BB.
F.A. Simon Nadin 1986
15. Reward (7b ) ★
The blank-looking wall just left to the roof. Surmounting this gives you the problem to a letterbox hold above.
F.A. Simon Cundy 1991
16. Monster Mouse Resurgent (7a) ★
A shallow groove, roof and open groove just left.
F.A. Richard Davis 1986
17. Aggrieved (6c+)
The wall between Disjointed Might and Monster Mouse.
F.A. Claudie Dunn 2000
Disjointed Might E5 6a The obvious reddened flake and disjointed crackline.
Sibser (7b+)
Hard climbing up the short wall by the abseil line. The name is an acronym standing for Simon’s Bolts Someone Else’s Route.
F.A. Unknown
Girdle traverses
There are two magnificent traverses of Two Tier Buttress with an incredible combination pitch linking them both. All three are incredible stamina problems:
Nervous Breakdown (7b+) ★★★
Begin by climbing Reward to gain the break and then follow this leftwards to a belay atop The Curse of the Mummy, 14BRs.
Communication Breakdown 7c+ ★★★
This time start by climbing Darl pitch 2 to the break and then follow this rightwards to the belay of The Curse of the Mummy, 15BRs.
Total Breakdown 7c+ ★★★
Combines the above two pitches by starting up Communication Breakdown and following this through the belay and reversing Nervous Breakdown to finish over the roof of Reward. Have you got enough clips? You’ll need at least 30!