Taerg Wall
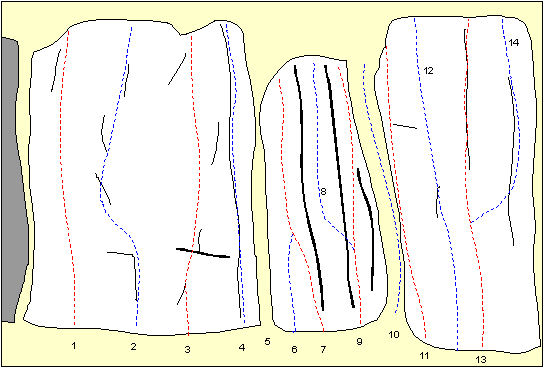
This is the impressively situated area of cliff just as you turn the corner from Shooting Star Area. A superb section of crag complete with the crag’s classic E2 and a number of harder and more technical routes with some situ gear.
1. Telegram Sam (E4 6a) ★
Pleasant and intricate climbing on the left-hand side of the next wall via a BR. Finish via an obvious crack.
2. Taerg Wall (E2 5c) ★★
The classic of the wall taking the centre of the wall via a short crack to get established on a ledge. Moving right and up via a PR provides the crux.
3. Wasters mall (E4 6b) ★★
Tackles the wall to the right in a fine position. Move up to a small undercut flake, then move left and up, PR, via a hard move to reach a good flake. Finish with relief slightly leftwards.
4. Heart of Darkness (E3 5c) ★
Good positions and open climbing on the right-hand arête of the wall.
5. Half and Half (HS)
The horrible chimney. Half climb, half grotto.
6. Sleeping Beauty (E3 6a)
The steep wall to the right of the cave, PR, leads with difficulty leads to easier climbing above.
7. Xuxu (E2 5b)
hard moves thorough the horribly hollow bulge to the right leads to easier climbing above.
8. Slither (VS 4c) ★
The thin crack branching left out of the wider crack.
9. Ivy Crack (HS) ★
The wider crack gives a classic old-fashioned climb
10. Wither (D)
The wider crack complete with loads-a-chocks
11. Christmas Spirit (E1 5b)
The finger crack in the left-hand side of the next wall finishing via hollow flakes.
12. Flash Harry (E5 6b) ★
The wall to the right gives a difficult offering via a thin crack, overlap, PR, and hard moves to finally finish leftwards.
13. Flash Dance (E4 6b) ★★
Technical face climbing via the thin crack in the right-hand side of the wall. 2PRS.
14. Jumping Jack Flash (E4 5c)
Breaks right of Flash Dance to climb the wall via a hollow flake, TR.