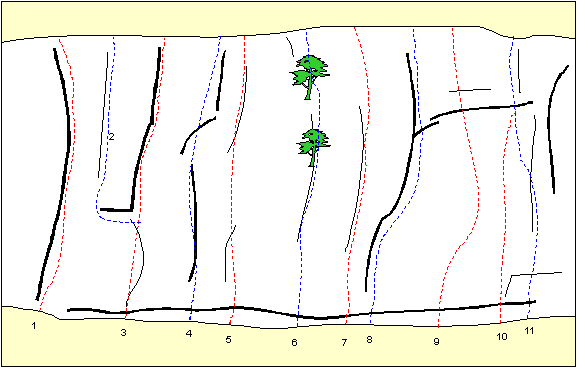
Shooting Star Area

This is the final section of crag before it turns onto the front face. It gives a fine section of cliff characterised by a prominent white wall of excellent rock bordered on the left by a prominent crackline, the line of Shooting Star.
1. Craznitch Crack (HS)
The wide overhanging crack.
2. Close to the Edge (E1 5b) ★
From 4m up the wide crack to the right, move left to gain a groove leading to the top.
3. Intensity (HVS 5a) ★★
The classic wide crack gives one of the best routes of the grade on the crag.
4. Gone Bad (E1 5b)
The next crackline guarded by a large prickly bush, a bit of a dogged rose, at its foot.
5. Going Bad (E2 5b)
The next crackline to the right finishing via some hollow holds on the pillar in the arête.
6. Yew and Me (E3 5c)
Difficult, fingery and hollow moves cross the bulge to gain a Yew tree and easier climbing above.
7. Cigars of the Pharaohs (7b) ★
The fingery bulging wall left of the prominent crackline gives a difficult problem easing above the 2nd BR.
8. Shooting Star (E4 6b) ★★
A classic of the area, packing it in for a relatively short pitch. The obvious rightward-trending crackline gives the line, the bulge and groove above providing the meat of the difficulties.
9. The Final Solution (8a) ★★
A hard technical exercise with fingery moves low down and an even harder finale.
10. Sisters of the Moon (E5 6a)
Something of a non-route attempting the climb the wall to the right but usually using holds in the next route.
11. Brigadier Gerard (E5 6a) ★
The vague and faint crackline on the right-hand side of the wall gives a challenging experience given the nature of the rock and protection, PR.